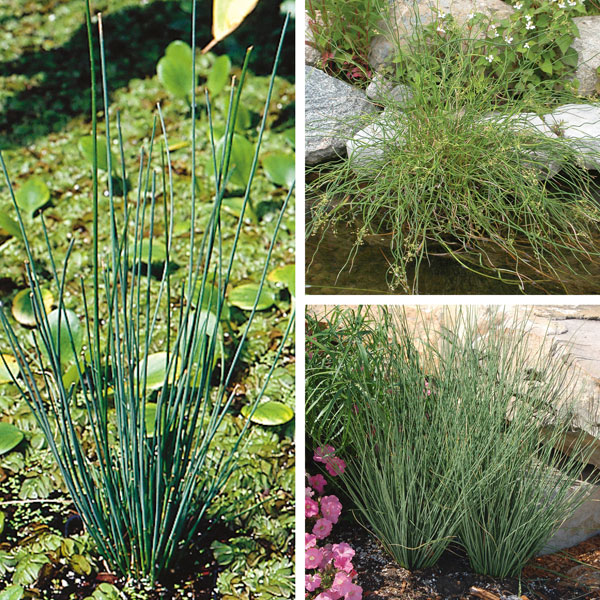
Juncus, Rush (Juncus species)
Features
Juncus provides the same design effect as other ornamental grasses, but with a lot more substance and definition because the blades are tubular rather than flat. Varieties are also available with very decorative, curling "corkscrew" foliage. These are particularly fun used as the centerpiece of a mixed container planting. The blue-green foliage of Juncus adds a cool hue to the garden or makes a striking contrast when combined with bright flowering plants.
Uses
Thrives in constantly wet areas where most plants would fail. Perfect for all kinds of containers, damp garden areas, or waterside plantings.
Plant Feed
Annually with organic matter.
Watering
Do not allow soil to dry out.
Soil
Slightly alkaline, organic-rich soil.
Planting Instructions
Perennials can be planted anytime from spring through fall.
Prepare the garden by breaking up the existing soil (use a hoe, spade, or power tiller) to a depth of 12-16” (30-40cm). Add organic matter such as manure, peat moss or garden compost until the soil is loose and easy to work. Organic ingredients improve drainage, add nutrients, and encourage earthworms and other organisms that help keep soil healthy. Give plants an extra boost by adding a granulated starter fertilizer or all-purpose feed that encourages blooming (for example fertilizers labeled 5-10-5).
Check the plant label for suggested spacing and the mature height of the plant. Position plants so that taller plants are in the center or background of the landscape design and shorter plants in the foreground. To remove the plant from the container, gently brace the base of the plant, tip it sideways and tap the outside of the pot to loosen. Rotate the container and continue to tap, loosening the soil until the plant pulls smoothly from the pot.
Dig the hole up to two times larger than the root ball and deep enough that the plant will be at the same level in the ground as the soil level in the container. Grasping the plant at the top of the root ball, use your finger to lightly rake the roots apart. This is especially important if the roots are dense and have filled up the container. Set the plant in the hole.
Push the soil gently around the roots filling in empty space around the root ball. Firm the soil down around the plant by hand, tamping with the flat side of a small trowel, or even by pressing down on the soil by foot. The soil covering the planting hole should be even with the surrounding soil, or up to one inch higher than the top of the root ball. New plantings should be watered daily for a couple of weeks to get them well established.
Plan ahead, for plants that get tall and require staking or support cages. It’s best to install cages early in the spring, or at planting time, before the foliage gets bushy. Vining plants require vertical space to grow, so provide a trellis, fence, wall or other structure that allows the plant to grow freely and spread.
Finish up with a 2” (5cm) layer of mulch such as shredded bark or compost to make the garden look tidy, reduce weeds, and retain soil moisture.
Watering Instructions
New plantings should be watered daily for a couple of weeks. After that, depending on the weather and soil type, watering may be adjusted to every two or three days. Clay soils hold moisture longer than sandy soils, so expect to water more frequently in sandy settings.
Different plants have different water needs. Some plants prefer staying on the dry side, others, like to be consistently moist. Refer to the plant label to check a plant’s specific requirements.
Ideally water should only be applied to the root zone - an area roughly 6-12” (15-30cm) from the base of the plant, not the entire plant. A soaker hose is a great investment for keeping plants healthy and reducing water lost through evaporation. Hand watering using a watering wand with a sprinkler head attached is also a good way to control watering. If the garden area is large, and a sprinkler is necessary, try to water in the morning so that plant foliage has time to dry through the day. Moist foliage encourages disease and mold that can weaken or damage plants.
Thoroughly soaking the ground up to 8” (20 cm) every few days is better than watering a little bit daily. Deep watering encourages roots to grow further into the ground resulting in a sturdier plant with more drought tolerance.
To check for soil moisture, use your finger or a small trowel to dig in and examine the soil. If the first 2-4” (5-10cm) of soil is dry, it is time to water.
Fertilizing Instructions
Incorporate fertilizer into the soil when preparing beds for new plants. Established plants should be fed in early spring, then again halfway through the growing season. Avoid applying fertilizer late in the growing season. This stimulates new growth that can be easily damaged by early frosts.
Fertilizers are available in many forms: granulated, slow-release, liquid feeds, organic or synthetic. Determine which application method is best for the situation and select a product with a nutritional balance designed to encourage blooming (such as 5-10-5).
Reduce the need to fertilize in general by applying a 1-2” (3-5cm) layer of mulch or compost annually. As mulch breaks down it supplies nutrients to the plants and improves the overall soil condition at the same time.
Pruning Instructions
Depending on the flowering habit, snip off faded blooms individually, or wait until the blooming period is over and remove entire flower stalk down to the base of the plant. Removing old flower stems keeps the plant’s energy focused on vigorous growth instead of seed production. Foliage can be pruned freely through the season to remove damaged or discolored leaves, or to maintain plant size.
Do not prune plants after September 1st. Pruning stimulates tender new growth that will damage easily when the first frosts arrive. Perennial plants need time to prepare for winter, or “harden off”. Once plants have died to the ground they are easy to clean up by simply cutting back to about 4” (10cm) above the ground.
The flowering plumes and foliage of ornamental grasses create a beautiful feature in the winter landscape. Leave the entire plant for the winter and cut it back to the ground in early spring, just before new growth starts.
Perennials should be dug up and divided every 3-4 years. This stimulates healthy new growth, encourages future blooming, and provides new plants to expand the garden or share with gardening friends.
Plant Details
| Available Colors: | Grown for foliage |
| Bloom Time: | Grown for foliage |
| Height Range: | 2-3' (0.6-0.9m) |
| Space Range: | 10-12" (25-30cm) |
| Temperature Range: | -20° to -10°F (-29° to -23°C) |
| Plant Light: | Full Sun |
| Companion Plants: | Astilbe, Hosta, Rose Mallow |
Availability
- Jan
- Feb
- Mar
- Apr
- May
- Jun
- Jul
- Aug
- Sep
- Oct
- Nov
- Dec